


Put your company’s name at the top. To be professional, you start with your company’s information at the top of the page. If you don’t have a company name, just start with your name at the top. It can be centered or all the way over to the left. [1]
- Treat the invoice like a business letter. That is, you can have a professional header at the top, centered in the middle. On the other hand, a simple statement of your business name is also effective.
Can you please put wikiHow on the whitelist for your ad blocker? wikiHow relies on ad money to give you our free how-to guides. Learn how .
Add your contact information. Put your address, phone number, email, and any other relevant contact information. Make sure to use your business information, not your personal information. [2]
- A fax number may also be relevant.
- If you accept payment services like PayPal, be sure to use the email you have set up with that account.
Add the addressee’s name or business. Just like with a business letter, you now move on to the person your billing. If it’s a business, use the business address and contact information that the company gave you. [3]
- If it’s a person, use what information you have, but preferably their business contact information.
- If you don’t have enough information, you may need to contact the person or business with the information you do have to find out more. [4] If it’s a large company, you may want to call anyway to ask exactly who to address the invoice to.
Include a customer account number. Create a unique identification number for each of your repeat customers. Then, make sure that this number is included on every invoice that you write for this customer.
This will allow you to group invoices by customer and, if necessary, assess their payment history or document a consistent failure to pay.

List a unique invoice number near the top. If you’re sending out invoices on a regular basis, it’s important that each one has a unique number so it’s easy to reference and identify. How you choose a number is up to you, but remember that you must have a new one for each invoice. [5]
- One simple way is to just start out at one and work your way up. To keep the length of the number uniform, you could start with “0000001.” [6]
- Another method is to assign a customer number and then use the date. For instance, if the customer number is 305 and the date is February 2, 2016, you could use 305-02022016 as your number. Just make sure you’re clear on what the “date” should be. Is it when the service was rendered or when you created the invoice?
Include the invoice date. Near the top, put the label “invoice date.” Next to it, add the date that you are creating the invoice. This helps both you and the customer keep track of the time. [7]
- You can also include the billing period. The billing period is based on how you set up your invoicing.
- For instance, if you invoice once a month, that means your billing period is from the beginning of the month to the end of the month, and the services you performed during that period will be included on the invoice.
Part Two of Three:
Listing the Service Edit
List the services you provided. This step is the meat of the invoice.
You’re telling your customer what you’re charging and why you are charging it. It’s important to not have surprises at this step, so make sure you are upfront with your client at all times. [8]
- Organize by date. If this invoice is for more than one date, it’s easiest to organize by date. Put the date all the way to the left. Either way, you need to include the date the service was rendered.
- List the service. Next to it, list the amount you charge per hour or per service. You’ll also need the number of hours or the number of times the service was performed. Finally, put the total for that particular service over to the right in the charges column.
- Create a new line for each type of service.
- List other charges relevant for service, such as charges for parts.
Add any other fees. If you have a delivery fee, you add it at the end, since it’s not a part of the service. You can also add any other fees you need to. Just make sure they are labelled well and clear to the customer. [9] The delivery fee may be taxed if you have sales tax in your area, so you can charge taxes on it after you create a subtotal. However, always check with an accountant to make sure you are charging taxes correctly. [10]
Create a subtotal. Add up all the charges that you have on the invoice. Put it in a line below the services as the subtotal with the label “Subtotal.” It’s the subtotal because you still need to add tax in. [11]
Add the taxes. Next, calculate the taxes. Put the tax rate below the subtotal labelled as the tax rate. If you don’t know the tax rate in your area, contact your local sales tax authorities to find out the number. [12] You can also look online to find the sale tax or contact your accountant.
- In some states, you won’t need to charge sales tax for services. Check your local laws to find out whether you need to charge it in your area. Also, it may very by the type of business. For instance, you may not need to charge sales tax if you’re a nonprofit. It also may depend on whether the primary object of the sale is the service (such as at the dentist) or the equipment (such as in computer repair). [13]
- Taxes are usually charged in the place the service was performed, so if you go to a customer’s place of residence in a suburb, you must use that city’s sales tax. However, again, always check your local laws. [14]
- Sales tax is a percentage. To figure out the tax, you multiply the subtotal by percentage, expressed as a decimal. For instance, if your total is $50 and the sales tax is 8.25%, you multiply $50 by 0.0825 to get 4.125. Round the number off as needed. Here the tax would be $4.13.
- Add the tax in. Next, you add the number you got to the original subtotal. In the example, you add $4.13 to $50 to get the grand total of $54.13. [15]
Create the total. Finally, list the total amount you just found. Put “Total” next to it to make it clear. Also, it doesn’t hurt to put a box around the total or to mark the final total in bold. [16]
Keep a thorough record of your invoices. It is best to have a digital copy and a printed copy filed away. If you have any emails, memos, or other documents related to an invoice, you should store those alongside a printed copy of the invoice, as well.
Add payment options. Your customer needs to know what methods they can use to pay. Do you accept checks? Can the customer pay by credit card, cash, or other payment processing system? If the only way the customer can pay is to come into your store in person, let them know that. Other options include mailing in a payment (either check or credit card number), calling in a payment (credit card number), or paying online. [17]
Include a due date. Your customer needs to know when they need to pay the invoice by. Include a due date prominently on your invoice. You can even include it more than once. One place to include it is down near the total amount due, but at the top is also a good option. [18]
- Payment should always have a due date with a consequence if not met (for example, interest charged on late payments).
- You might also include an incentive for early payment (like a 2% discount if paid in ten days), since most small businesses have constant cash flow problems.
- You should also discuss whether you have a payment plan option. You can include the information with the letter, or write something like, “If you can’t pay your bill all at once, call our office to set up a payment plan.” [19]
Send the invoice. Once you’re done creating the invoice, send it to your client. It will let your client know they need to pay what is owed you. Make sure to make your company’s name prominent on the outside of the envelop. [20]
- Invoices should be coordinated with accounting system. An invoice, once written, becomes an asset of the company (Accounts Receivable) and should be properly recorded.
- If you use accounting software, you may have the option to let the software create an invoice for you. [21] Services like PayPal also have built-in invoice creation. [22]
Collect on your invoices . If you don’t get a response from the customer after sending your invoice, try making a phone call to make sure the invoice was received. Another option is emailing the client a reminder. It’s important to have a well-defined and standardized collections process so that you can more easily collect on your invoices.
- You can also send out reminders through the mail. How many you send out before a “final payment” notice is up to you. It’s important to reiterate you have a payment plan option if you’re willing to let the client pay it out over time.
- Once you’ve sent out as many as you’re willing, you can send out the “final payment” notice that lets the client know you’re turning it over to a lawyer or collection agency. [23]
- To establish a system, try having specific collection actions spaced out regularly across your collections period. For example, try sending notices after the balance has gone unpaid for 15 days, 30 days, 45 days, and so on. Each can specify how many days are left until payment and what actions will be taken if the balances goes unpaid.
- Try sending at least one notice by certified mail, so you know the client received it.
How to Invoice a Customer
How to Create a Commercial Invoice
How to Get Clients to Pay Invoices Promptly
How to Respond to an Invoice for Goods or Services Your Company Didn’t Purchase
How to Be a Billionaire
How to Do Economic Order Quantity Analysis
How to Forecast Demand
How to Calculate an Annual Percentage Growth Rate
How to Sign over a Check
How to Create an Excel Spreadsheet Annual Budget

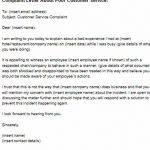 Writing a complaint letter about poor service
 Writing restful services in java
 Dissertation le service public et leurope hotel
 Cheap law essay writing service uk
 Andy maslens persuasive copywriting services


