Checking Account Basics
Basics
The primary benefit of getting a checking account is the ability to write checks. Checks can be used to pay bills at a store, give a person a check if you are short of cash, or send a check through the mail or electronically. Checks allow you to pay for things without having to carry large amounts of cash. But writing a check or receiving a check does not guarantee the money is the bank, unlike an ATM or Check Card. Most people will want some basic information if you are using a check, such as your address and phone number, and most will also require you to show a photo ID and some will even take down your driver’s license number. A growing trend with most banks is allowing their checking account customers to pay online. The benefit to the merchant or person receiving a check directly from the bank is that before the bank issues “your” check, it makes sure you have the money in the account and deducts it immediately from your available funds.
Ordering Your Checks
When you open an account, one of the first things you will do is to order your checks. Frequently the bank will pay for your first set of basic checks or charge you just a minimum fee. You can also order, for a fee, checks in different colors or ones with an interesting design. There are also different styles of checkbooks, so see which one works best for you.
All checks will have your name on them; most will also have your address. Telephone numbers are optional. Most people don’t put this one their check although some people like to, since most people/merchants who accept checks require this information (although perhaps you might want to withhold it on a printed check for security reasons), along with another form of identification (photo ID preferred or required).
When your checks arrive be sure to confirm that all the printed material is correct. There will also be a separate book (depending on the style of checks you ordered) called the Check Transaction Register so you can record the information about each check, indicate deposits and withdrawals, fees and balances. Whatever you do, you always need to know how much money is in your account so you don’t write a check for more than you have (this is called bouncing a check). If you bounce a check, the person you made it out to will be very mad. Second, your bank will probably charge you a hefty fee, probably $25 or more, for the bounced check. The bank may or may not cover your account for the overdrawn amount until you make a deposit to cover the shortfall. Some banks automatically enroll you in an over-draft protection plan. You might write a check for $20, it bounced and you then owe the bank not only the $20 but an additional $25 fee for the bounced check. You can refuse this service you if want. Sometimes people make a deposit and then write a check. If you deposit doesn’t clear by the time the bank get your check, you are overdrawn. Check with your bank to make sure your deposit has cleared before you write a check. Sometimes a check can take 5-7 business days to clear.
How To Write A Check
Here is how to properly write a check. If you make an error, you have to write a big CANCEL vertically across the check, rip it up and start all over again (remember to mark Void on your transaction register too, which is explained below).
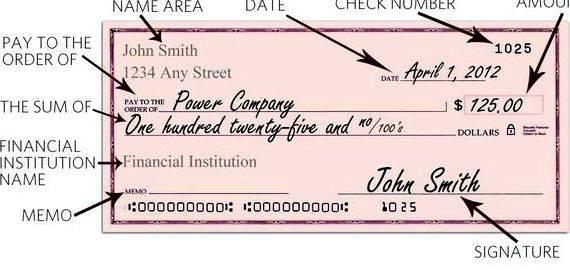
The information you write on the check should be duplicated in your check transaction record.
- CheckNumber: The number of your check (upper right hand corner, also one of the numbers on the bottom of the check). It is a good idea when you pay a bill to write the check number, date, and amount you paid on the invoice (bill) for your records.
- Date: Make sure you put in the correct date. Month/day/year. Banks won’t take a check dated in the future.
- Pay To The Order Of (or Payableto): Make sure you have the complete and accurate name of the person or company to whom you are writing the check. No nicknames! If you call your friend Bobby, but his legal name is Robert and that is what is on his checking account, you need to write Robert.
- $ (Dollar amountNumeric): Put the dollar amount of the check in numbers. Start writing the numbers close to the printed dollar sign. It has to be legible. Put in the decimal point for cents ($50.25). If you leave too much room, $ 50.25, a dishonest person might add a digit before the first digit 5 like $150.25).
- Dollars (amount written inwords): This is where you write amount the amount of the check in words for the whole dollars (Fifty dollars), and a fractional figure (25/100) for amounts less than a dollar. This is how that bank confirms the amount in case your hand writing is not legible. Also, draw a straight line to fill up the remaining space on the line ending with the world Dollars, like this:
- Fifty Dollars and 25/100—————Dollars.
- SignatureLine: The line on the far right is for your signature. Use the exact name you used when you opened your account. You filled out a signature card which your bank keeps in case there’s a question about your signature. If you are in a different branch, the bank may ask your own branch to transmit a copy of your signature card to make sure you are who you say you are and the signature matches.
- Memo: Usually a space on the bottom left, opposite the signature line. Use this line to put your account number if you are paying a bill, or any other information that may help the person processing your payment to identify your account.
- Numbering at theBottom: This is like a bar code on merchandise, it lets banks and clearing houses know how to handle the transaction. There are three groups of numbers at the bottom of each check separate with a: (need symbol at bottom of check bold vertical dash with bold squared colon). Some banks put these numbers in different order. My bank puts the routing number first, the account number second and the check number third (some banks put the check number between the routing and account number):
- Bank Routing Transit Number (orABA). This is a nine digit number that banks in the United States use to identify the financial institution (bank) on which the check is drawn. This code is used by the Federal Reserve Bank to process the check; the Fedwire to transfer funds to another account; and the Automated Clearing House to process direct deposits and other automated transfers.
If you ever need to send money using a wire transfer
(which can take less than ½ hour), versus a check, you will needto provide:
- Your banks’ Routing Transit Number
- Your Checking Account Number
- Your Check Number
- Bank Name: Some banks only print their name on your checks; others also include the bank’s address, especially the smaller banks.
Beware of making a check out to cash. Anyone can cash this check. If someone steals your purse/wallet and finds a check made out to cash, they can just go to their bank and redeem it. It is a much better practice to write out the person’s name or business. If you want money, write a check out to yourself.
How To Make A Deposit
Deposits are a good thing. That is when you are putting money into the bank. You can put either cash or checks into the bank. Either way, you must fill out a deposit slip.
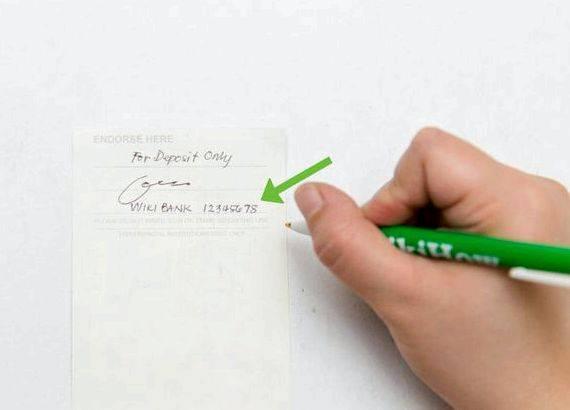
If you deposit a check (assuming it is made out to you), and you want to deposit it, turn the check over and you will see an Endorse Here section. Sign your name. On the next line put the words For Deposit Only, and then on the third line put your account number.
When you first receive your checks you will also receive either separate deposit slips, or it will included at the back of your checkbook. Generic Deposit slips are also available at your bank and at the bank’s ATM machine. At the ATM machine envelopes are provided to make your deposit (include your endorsed checks and a deposit slip). If you don’t have your slip and are using the bank’s generic deposit slip you must fill in your account number and name.
- Date: First line on the left. Note: deposits may not be available for immediate withdrawal. Banks need to clear checks first, unless you presently have sufficient funds to cover that amount.
- *Sign Here for Cash Received ifRequired: If you would like cash back (under date line).
- Cash: The first line on the upper right would be the total amount of “Cash”, if you’re depositing coins or dollar bills.
- Checks: The second line down on the right and on the back would be for your checks. On the line to the left put in the check number. Then put in the dollar and cents amount. If you have hit the jackpot and need more room to enter checks, use the back.
- Subtotal: Line for the total amount of checks and cash you are depositing.
- *Less CashReceived: Put in the amount you want to withdraw, if any.
- $: This is the bottom line with the dollar sign for the total amount you are depositing. In most cases, since you’ll be making deposits separately from withdrawing cash, this will be the same as your subtotal line.
Transaction Register
After you write a check you need to record it, and all other transactions (withdrawals, deposits, fees) you make. Although there are different styles of transaction registers, all have space for the same information (some might have additional columns so you can put information about how the check is being used, i.e. medical expenses, school expense). You start with the amount of money you open your account with. After you write a check you then register (put the information about it) in the book:
- CheckNumber: The number is shown on the upper right hand side of the check (also on the bottom). Checks are in sequential order. If you make an error on a check, still write the check number and then write “Void” in your register. This way you’re sure you aren’t missing a check.
- Date: The day you write the check. Note: Just because you write the check, the person/merchant receiving the check might not immediately bring it to their bank to deposit. Furthermore, banks often take a few days to process your check. If you write a check on March 15st, and you receive your statement on April 1st, there is a chance it won’t be included in that statement (see balancing your checkbook).
- Description ofTransaction: Record who the check was made out to. Not only do you need to include all payments made, but also all withdrawals (and for your records what it might have been used for). If you use an ATM or purchase something with a debit card you need to include that amount as well. If you use a debit card, and incur a fee for your usage, you need to indicate that also. If you pay online, the bank will give you a confirmation number code, you might wish to include this also, along with the payee information. You need to keep one source for all your transactions in order to reconcile your bank statements (make sure they are correct).
- PaymentAmount: The amount you wrote the check for.
- WithdrawalAmount. The amount of money you took out.
- FeeAmount: Any fees that might be incurred during a transaction. The main fees will be from ATM machines that are not associated with your bank. Also based on the type of account you have the bank may impose a monthly service fee which also must be deducted.
- DepositAmount: Money you put into the account.
- Transfer: If you have more than one account and move money from a checking to a savings account or one account to another.
- Balance: Based on the kind of transaction you made, add or subtract that amount from the previous balance to come up with your new current balance. Let’s say you had $200 in the bank, you wrote a check for $50 to purchase new clothes at a store, your new balance is now $150). Make sure you correctly add (if you put money into your account), or subtract (if you take money out or put it into another account).
Balancing Your Check Book
Each month you will receive a bank statement by mail unless you have agreed to receive it online. Carefully look over your statement. Place a checkmark in your transaction book next to all the items that are also on your statement. Take note if there are any differences. Add any interest the bank has paid you; subtract any fees the bank may have charged (make sure they are legitimate). Subtract any checks that might not have cleared. If you find any discrepancies between your numbers and the bank’s you have a little detective work to do. You need to find out why. This is not fun, but necessary.
Start by checking your math; make sure all your additions and subtractions are correct. Subtract the balance in your transaction register from the balance statement. Does the amount match the amount of one of your transactions? If you still find an error, or see an inappropriate fee, contact your bank.
It is a good idea to create a cushion at the bank. Keep a little extra in your account, a certain minimum balance, in case of an emergency or you forget to record a transaction. You never want to bounce a check or have your bank call you saying you have insufficient funds. This can cost you dearly, with additional fees/penalty or loss of interest, if that applies. Periodically review the type of bank account(s) you have. Have your circumstances changed? Is this still the correct type of account for you? Here is a good site if you have any further questions.
Online Banking
Almost all banks give you the option to bank online. You sign up at your bank’s Website and create a password. Online banking services usually allow you to transfer funds between savings and checking accounts; check credit card accounts; pay bills electronically; purchase and track Certificates of Deposits (CD’s), and other investment services. Some banks charge a fee. Check with your financial institution. If you use the online bill pay, you do not have to write out envelopes or pay for postage stamps. And banks keep excellent, clear records! But remember to periodically print out a copy of your account since the banks only keep this information for a short period of time, generally less than one year, possibly as few as three to six months.




 Literature and creative writing phd uk
 Grammatical correction software easily check your writing online
 My left foot writing scene play
 My dream holiday writing activity
 My snowman melted writing activity first grade
