– 22nd October, 2014
In the last post I showed you how to make an outline for your thesis in Word. You should now have a document outline with a list of headings for your sections (maybe even a few sections filled in if you were feeling motivated to make a start!). From here, we can move on to:
- Setting up a Table of Contents,
- Learning to insert captions which will make compiling a List of Figures/Tables at the end a painless process
- Learning how to cross-reference your document, so that figures or paragraphs that you refer to in the body text are always numbered correctly, even when you move things around.
Automatically generating a Table of Contents
A thesis requires a detailed table of contents that lists the headings and page numbers of each section. Rather than manually scrolling through your document making notes of where everything is (and having to go back and change numbers every time you add something new or move a section) why not let Word do all the hard work?
When your document is properly laid out, generating a Table of Contents in Word is as simple as 1, 2, 3 (something my silly undergraduate self could sorely have done with knowing 3 years ago!!).
With the cursor at the start of the document where you want to insert the Table of Contents:
Done. It’s that easy when you have things set up properly!
The Table of Contents will be generated automatically using the different levels of heading that you defined when you set up your outline. This is why it’s really important to use the headings from the styles gallery rather than just manually changing the size and font that you’re using.
Don’t forget, if you move things around, add bits in or remove others, you should update your Table of Contents too!
Return to the Table of Contents options in the References tab and select “Update Table ”.
Inserting captions
After a Table of Contents, most theses also include a List of Tables and a List of Figures. To make compiling this list less difficult, you can use a specific kind of label each time you insert tables and figures that will allow you to generate the list automatically in Word.
- Go to the References tab and click on “Insert caption ”
2. Select a label from the dropdown list for what you are inserting i.e. Table or Figure and press “OK ”.
3. Next to the caption Table 1. add a title for your table, which will appear in the list of tables.
4. When adding a figure legend for tables or figures, make sure to go to the next line after the title to ensure the entire legend doesn’t get included in the list!
Create a list
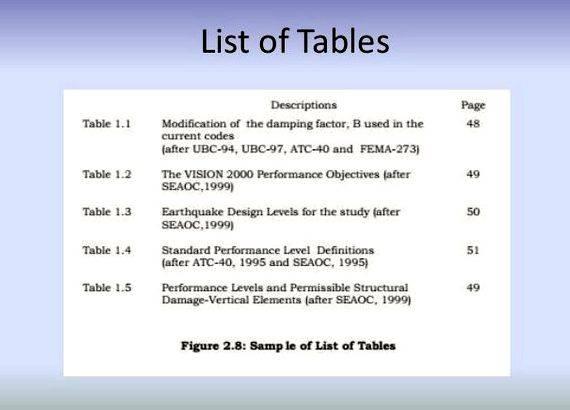
Once your figures and tables have been captioned, inserting a list is very similar to how you created a Table of Contents.
With the cursor at the point where you want to insert the list:
- Click the References tab
- Click “Insert table of figures ”
- Select a caption label (table or figure )
- Click &”OK&”
Update
Ideally you will be inserting lists of figures and tables at the end when the layout of your thesis is pretty much finalized. However if you need to move your tables or figures around and the order or page number changes, don’t forget to update your list!
- Click anywhere on the list to highlight it
- Click “Update table ”
And done! I repeat –it’s that easy!
Cross-referencing
Another useful tool found in the References tab is the Cross-reference button
Cross-referencing allows you to link back to other paragraphs, tables or figures referring to them in your body text.
Cross-referencing is useful for not only creating a hyperlink in the text for you to jump back and forth, but also for keeping your referenced paragraph, table and figure numbers up to date if you need to move them about. This saves you the trouble of going back and re-numbering every paragraph where you have mentioned a figure or table whose number has now changed!
***A small warning with this one, sometimes it doesn’t automatically update immediately – if after saving and re-opening your document it has still not updated, you might need to insert or update the List of Figures or Tables for the document to recognise that things have been moved a little bit so don’t panic too much!***
Using Word to automatically generate your Table of Contents, Lists of Figures or Tables and to ensure that your internal references stay up to date takes a little bit of planning and some practice, however it will also hugely benefit you in the long run! Thinking back to my silly undergraduate self, leafing through a printed copy of my thesis, typing out each heading, fretting that the numbers weren’t aligned properly and nearly having a nervous breakdown when my supervisor suggested moving things because I would have to redo it all, I shudder at the wasted hours that could have been spent doing something productive (like learning to use Word properly!).
The bottom line is that writing a thesis is hard enough as it is, don’t give yourself extra work that the computer could be doing for you instead.
**Note: All screenshots taken from Word for Windows, 2013.
This checklist will help you find formatting items that need to be corrected so that your thesis can be accepted as the final step for your graduation.
- Use the following checklist or the links in Organizing Your Thesis to carefully check the formatting of your thesis/dissertation. Carefully checking these items will speed up the acceptance process for your thesis.
- After all the items have been checked, use the SUBMIT button at the bottom of the checklist to go to the next step for submitting your thesis/dissertation.
- Are the parts of your thesis in the correct order? Organizing Your Thesis/Dissertation chart
- No page number can be displayed on title page
- Title should display about 1.25 inches from the top of page
- Capitalize only the first word of the title unless it is a proper noun or the first word following a colon
- No period after the title
- No minor displayed – Only Major (specialization) is correct
- Do not use Dr. Esq. PhD, AIA, or other titles or affiliations before or after faculty names
- Faculty name, Major Professor or Co-Major Professor. If Co-Major Professors, then there is no Major Professor
- Spacing matches the online examples
- Your name should be in BOLD in the top portion of the Title Page. Single space the committee member names.
- OPTIONAL: statement – List the year of actual graduation. Your name should be listed exactly as it is written earlier on the Title Page
- TABLE OF CONTENTS, is in all caps and centered like Chapter Titles
- In preliminary pages, numbers are lower case Roman numerals, top center
- Page number columns in Table of Contents, List of Figures, and List of Tables are aligned to the right digit
- Long titles do not run into the page number column
- Single-space chapter entries. Double-space between chapter entries
- Titles have all the same capitalization, size, and same font
- Include the word Chapter and number before each chapter title. (Ex. CHAPTER 1. XXXXXXX)
- Preliminary pages are numbered with lower case Roman numerals
- Chapter 1 starts with page 1
- All page numbers are at the top center of the page, in the same size font
- Each page has a page number and all page numbers are in sequence
- Landscape page numbers should be in the same location and orientation as all other pages (example)
- Choose one style:
- Leftbound: Top: 1′; Left: 1.50′; Bottom: 1′; Right: 1′; Page numbers (in headers) set at .5′ from top center
- Unbound: Top: 1′; Left: 1′; Bottom: 1′; Right: 1′; Page numbers .5′ from top center
- Consistent margins throughout the thesis
- Tables and figures are within the margins
- Text should be double-spaced and, consistent throughout thesis
- References, tables, appendices, footnotes, endnotes, and block quotes may be single-spaced, with a double space between listings
- Consistent spacing before and after titles, headings and subheadings
- Indent the first line of all paragraphs, including Abstracts
- 12 point size for text of thesis; tables, figures, footnotes and endnotes and Appendices may be 10 point
- Standard proportional fonts, such as Arial, Times New Roman, Calibri, Cambria, or a similar proportional font
- Same font used throughout thesis text (tables and figures may differ)
- LIST OF FIGURES or LIST OF TABLES is in all caps and centered like chapter titles
- Page is Numbered using lower case Roman numerals, top center
- Page number columns in Table of Contents, List of Figures, and List of Tables are aligned to the right
- Table or Figure titles do not run into the page number column
- Single-space list entries. Double-space between list entries
- Titles have all the same capitalization, size, and same font
- Indent the second line of a title if it is wrapped to a second line
- ABSTRACT, is in all caps and centered like Chapter Titles
- Numbered using lower case Roman numerals, top center
- Abstract should be double-spaced or 1.5 spaces like the text of the thesis
- Indent the first paragraph of your Abstract like other paragraphs in your thesis
- All Top Level (Preliminary Pages, Chapter Title, Reference/Bibliography, and Appendix) headings must be in all caps, the same size font, and location at the top of the page
- Top Level headings may be no larger than 16 point
- Paragraphs are indented
- No blank pages
- No excessive white space in text
- Organized in a coherent and consistent manner, same size, location, font, etc.
- All Top Level (Preliminary Pages, Chapter Title, Reference/Bibliography, and Appendix) headings must be in all caps, the same size font, and location at the top of the page
- Top Level headings may be no larger than 16 point
- Headings are used in a consistent manner, same size, location, font, etc.
- Differentiation exists between heading levels
- Chapter titles should include chapter and number centered in ALL CAPS (ex. CHAPTER 1. INTRODUCTION)
- Secondary headings are centered with initial caps
- Third level – left margin, initial caps
- 12 point proportional font
- At least two lines of a paragraph should be included on a page
- Do not leave heading or subheading alone at the bottom of a page
- Do not include any personal information, i.e. phone number, address, etc.
- Table and Figures can be included in the text near their reference or they can be grouped at the end of each chapter. A consistent style should be used for all chapters
- Margins on the pages with tables or figures should be the same as your manuscript pages
- Table captions are located at the top of the table, figure captions are located at the bottom of the figure
- Captions longer than one line: use consistent line spacing and indention (single space is OK)
- Table/figure too large to fit on one page: use “Table/Figure X continued’ at the top of each subsequent page
- Landscape tables and figures should be turned so that the top of the table/figure is to the left
- Page numbers on landscape pages should not turn with the table/figure. They should be located on the 8.5′ end of the page in the same position and orientation as all the other page numbers (example)
- Follows ISU requirements for Journal Paper (example)
- Each paper starts a new chapter, which can include Abstract, Introduction, Tables, Figures References and Appendices as part of the chapter
- Use paper’s title as main chapter heading
- Beneath paper’s title, indicate the publishing status and the name(s) of the author(s)
- Include an explanation of your role and/or the co-authors’ roles in the research/preparation of the paper
- Begin the text of the paper on the same page as the title
- Each appendix must have a Top Level heading, in the same location as, and formatted like, all the other Chapter titles
- Must be displayed as Top Level headings in your Table of Contents
- All pages are numbered in the same font and location as text pages
- If there is only one appendix, do not put an A or I or 1 after Appendix. If multiple Appendices use letters or numbers such as Appendix A, Appendix B, etc.
- Letters and documents should not contain signatures or personal information
- Consistent academic style for your discipline
- Within chapters, the bibliography should not start on a new page unless there is no space on the previous page
- If bibliography is at the end of a paper, it is a major heading and starts on a new page
- Website URLs must contain complete descriptions and dates of the information used and dates of access of that information
- Single space references, double-space between
Biographical Sketch or Vita (optional in thesis)
- Follows ISU requirements for Biographical Sketch or Vita (example). Do not include personal or contact information
It is important that you have met all the formatting requirements so that your thesis can be promptly approved for your graduation.
Use the ‘Submit Your Thesis’ link below to go to the next step. By using to the link below, you verify that you have checked all the formatting guidelines listed in the Thesis Checklist or in all the links in Organizing Your Thesis.
- After clicking the submit button below, you will be taken to the website for uploading your thesis to ProQuest.
- Once your thesis has been uploaded, be sure to check the e-mail address you entered on a frequent basis.
- You will receive a request to make changes or an acceptance e-mail.
- If any changes are needed, they should be made within 24 hours if at all possible.
- You will need to receive an acceptance e-mail before you will be allowed to graduate.


 Sure thing david ives thesis writing
 Harvard reference doctoral thesis writing
 Questioned document examination thesis writing
 Online membership and billing system thesis proposal
 Industrial building system thesis proposal
